Category: Uncategorized

  • Holy Grayl? Not quite…

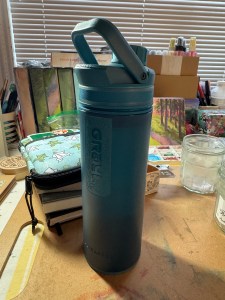
    I have had the Grayl Ultrapress for two years now. I haven’t thought I really needed to use it, because the places I have hiked & camped have had portable water spigots and fountains at their trailheads and sites. I used it intermittently anyway so that I could become familiar with it for the times when I would actually need it.

    A blue water bottle with a spout and handle, with the words Grayl down the side and Ultrapress at the bottom. It is translucent plastic with a rubberized cap and ring around the bottom for traction.
    A blue Grayl Ultrapress sits on my kitchen table among my art supplies.

    With all of the news stories lately about PFAS in drinking water, I decided to use it even at home, as news reports have mentioned that it’s in water supplies in many places – including my area in general (though my particular municipal water system claims it does not have PFAS). Grayl’s website states it will filter PFAS.

    Pros:

    • Filters AND purifies water (most other products only filter) including PFAS.
    • Not an attention grabber – it looks like any regular water bottle.
    • Simple to use (that isn’t necessarily the same as easy to use)
    • Can pour filtered water into another container easily

    Cons:

    • Requires user to be able to stand on a solid surface and use their upper body weight to filter (difficult for wheelchair users and folks on small watercraft)
    • If a larger amount of water is needed (for cooking, sharing with others, etc) you have to repeat the process multiple times, which expends more energy than other methods of filtering
    • Expensive
    • Filter cartridge unit cannot be back flushed/cleaned to extend its life
    • Does not fit in my car’s cup holders

    It did not take me long to get tired of the small amounts of water (16.9 oz) I can get from the bottle, and I ended up getting a 2 gallon carbon filter for home use, which has worked well.

    It was a valuable experiment, since it made me realize that although my tap water seems fine to me taste wise, it has actually made a positive difference in how my tea tastes.

    I do sometimes take it with me when I leave the house so that I can filter on the go without attracting a lot of attention, though I tend to prefer to bring 2 large Nalgene bottles with me that hold what I need until I return home, especially when I go hiking. For larger amounts of water filtering, I have a Sawyer Squeeze Mini in my gear, which I can backflush to clean.

    I have tossed the Grayl into my car emergency bag, so it is there if I need it, but it’s not going to be in rotation to be regularly used.

  • Backpacking foods review: Mountain House Chicken Teriyaki

    Summary
    Rating: 3 of 5 long handled spoons
    Ease of prep: 4 of 5 (two soaks, but they are short)
    Possible hacks: add a packet of soy or teriyaki sauce, pineapple

    The bag

    This is edible but not great, from the comfort of home. I immediately added soy sauce because that helps anything, but this has 59% of the daily allowance of sodium so that’s probably not a great idea. Though if I have been sweating on a hike the level of sodium isn’t as big a deal. The soy sauce improved it from bland to mediocre.

    I immediately thought adding some freeze dried pineapple bits would actually really brighten it up. Possibly some lime juice.

    The chicken chunks don’t really have much taste, they just add mouthfeel.

    Probably sufficient after a long trail day but not anything to crave.

  • Backpacking food review: AlpineAire Foods Forever Young Mac & Cheese

    Summary
    Rating: 3 of 5 long handled spoons
    Ease of Prep: 5 of 5 (open & add hot water for one soak)
    Possible hacks: add a can or packet of cooked chicken, paprika, more cheese, tomato sauce, salsa or ketchup, garlic powder

    The package of mac & cheese

    I think the “forever young” part is supposed to allude to the box mac & cheese that kids like, but it doesn’t have the tanginess that I always associate with box mac & cheese. It’s missing something. It’s completely sufficient and there’s a ton of it in the package, but it needs something, at least on the couch, and probably in camp too. I threw in a bunch of paprika and some extra shredded cheddar. I will say there is a TON of veggies in it, they did not skimp on the corn & peas, though I am not seeing as much carrot.

    I wish it was easier to divide up these 2 serving meals because this one is a BIG CHONKER of a meal. I am not sure I could finish it on my own even after a day of hiking, especially if I add something for taste, like a packet of cooked chicken.

    Once in awhile I get a crunch from pasta that did not rehydrate completely so I definitely recommend waiting longer than the package prescribed 10-12 minutes, though I did skimp a little on the water in hindsight, as everything is generally soupy, so perhaps I shouldn’t blame them for that.

    I will give it another try in camp and see how it goes. It’s not bad, just not stand out.

  • Backpacking food review: Backpacker’s Pantry – Blueberry Peach Crisp

    Summary:
    Rating: 4 of 5 long handled spoons
    Ease of Prep: 5 of 5 (open & add hot water just once)
    Possible hacks: add more cinnamon , more granola or slivered almonds on top for crunch, milk

    The package of Blueberry Peach Crisp next to a mug of tea.

    Even from the comfort of home, this is pretty darn good. It’s something I could make heck of a lot cheaper at home with frozen fruit, oatmeal, and granola. On the trail I could see it being really good. But I could perhaps make my own for cheaper since freeze dried fruit is commonly available, and I can add more cinnamon to my taste.

    The crisp inside the bag.

    I think DIY crisp is an easy trail meal to experiment making myself, and I can change up the fruit as I want – strawberries or mangos sprint to mind.

    So it’s good, but probably not something I will buy often unless I want a really lazy or last minute camping experience.

  • Backpacking food review: Mountain House – Ice Cream Sandwich, Mint Chocolate Chip

    Summary:
    Rating: 4 of 5 long handled spoons
    Ease of Prep: 5 of 5 spoons (just open package)
    Possible hacks: none needed

    The package

    This is a freeze dried ice cream sandwich and I love it even sitting on my couch… except that it’s a bit messy. Not so much a problem out in the wild.

    I opened the package expecting it to just be hanging out in there, but it was wrapped in paper like any ice cream sandwich, though there was a puzzling slice up the side. Perhaps that’s part of the freeze drying process. Do they just get regular premade ones and then slice it to let moisture out?

    It’s actually pretty tasty and I’m having fun munching on it, so all in all, it’s a nice snack, and doesn’t require special storage, though I’m not sure how sturdy it would be shoved into a backpack and smushed by everything else in there. Oh dear, I guess I have to buy another one to test this out… you know, for science. That’s a sacrifice I’m willing to make.

    Why did I give it 4 out of 5 long handled spoons instead of 5 out of 5? I guess because it’s not *really* ice cream at this point. It’s something else. But it’s good!

  • Backpacking food review: Backpacker’s Pantry – Summit Breakfast Scramble

    Summary:

    Rating: 3 of 5 long handled spoons
    Ease of prep: 4 of 5 spoons (will have to reduce water amount)
    Possible Hacks: add paprika, packets of salsa, bacon bits, jerky; bring a biscuit or flatbread to add more bulk

    Package of Summit Breakfast Scramble sitting beside a glass mug of tea.

    So that I can remember what backpacking meals I like and which ones I had, I am going to write short reviews of them here with notes on how I prepared them & potential hacks to make them better.

    I had planned a camping trip this week but I ended up canceling my reservation because the low temperature is near freezing, it’s been raining a deluge & all the hiking trails have been closed, and I have a three season tent. I decided it wasn’t the best idea to go. I am probably still going to drive to the park I was going to camp at to get out of the house & check it out, but the trails will likely still be closed.

    I had stocked up on backpacking meals. I like to eat a meal at home at least once to make sure it’s not absolutely revolting, or if it tends to say it needs more water than it actually needs.

    This morning I decided to try out the Summit Breakfast Scramble from Backpacker’s Pantry from the comfort of my own couch since I could not be out on the trail.

    It’s described as “scrambled eggs, red beaks, cheddar cheese and peppers.” The directions say to put in 1 cup of boiled water and stir, seal and wait 8 minutes, then stir again and wait 7 minutes. I found it was still pretty soupy after that, and waited another 5 minutes. It was still pretty soupy, so next time I will try reducing the amount of water. The taste wasn’t bad, and it could have been eaten just that way, but I wanted scrambled eggs, darn it. I tossed in some shredded cheddar that I had in the fridge to see if it would thicken up any, and it didn’t really. I added a packet of Sonic salsa for a little extra kick and ate it.

    Not the best breakfast ever, but it would be fine in camp or on the trail.

    Thinking out loud, so to speak: Should I make a rating system/matrix? I think maybe this would be 3 out of 5 long handled spoons – not bad, not great. Inoffensive, but I am actually still hungry, so would likely need to plan to supplement this with something if I was planning on being active. It wasn’t difficult to make, but I have to reduce the amount of water a bit. Unless I add jerky to soak in the rest of the water an rehydrate, which will add some protein to it. From past egg based experience, I know adding paprika is a good step, though I skipped it this morning.

    Would I buy this again? Yeah, unless I find like some holy grail of breakfast scramble in a bag that becomes my go-to.

    Photo of the meal itself inside the foil pouch
  • This milkshake machine kills fascists

    A couple eons ago in pandemic time, folks were throwing milkshakes as protests, and some whiny people tried to say they were getting hit by milkshakes containing concrete, which is a separate thing from calling a very thick milkshake a concrete. There has been zero evidence found that anyone actually put concrete mix in a milkshake and threw it at a fascist. At the time though, I remembered making milkshakes using a mixer at a fast food job I had once upon a time, and I had recently been looking at the famous picture of Woody Guthrie with one of his “This machine kills fascists” guitars… and my brain put those in a blender, and out came a drawing.

    Drawing of a milkshake blender and a milkshake with the text “This machine kills fascists” around it.

    Anyway, the topic came back up recently, and I mentioned the drawing, and that I should clean it up in Procreate and make it available to anyone who wants to make a sticker out of it, and I was encouraged to, and to make it available as a coloring page as well. So I did!

    I tried to make the text look similar to one of Woody’s guitars, without tracing it.

    Here’s a PNG that anyone is welcome to make into a sticker if you’d like:

    PNG with lineart of the “This machine kills fascists” milkshake blender art.

    And I am also attaching a PDF of the line art, so you can print it and color it as well!

    Please enjoy, and whatever you do, don’t be a milkshake duck.

  • Kanzashi-A-Long

    If you’re a space gnome (and you will know if you are) then you might be doing a Kanzashi-A-Long with me on Saturday.

    Kanzashi is a short name used in the west for what’s technically called Hana Tsumami Kanzashi. They are the flowers folded from silk fabric that are often used on hair decorations that are *actually* called Kanzashi. Kanzashi are made out of different materials/in different forms, and Hana Tsumami Kanzashi is just one form.

    A beautiful purple Hana Tsumami Kanzashi I purchased last year in Tokyo, and a small single flower on a barrette I made quite a few years ago.

    What are you going to need to make Kanzashi flowers? Here is a supplies list of things that might be in your house right now, since you’re staying home, right? There are a couple methods that you can use depending on what you have.

    Supplies

    If you have fabric:
    – Fabric – quilting cotton or if you’re brave, silk (on the heavier side is probably better)
    – Needle & thread OR Aileen’s tacky glue OR fabric glue
    – Scissors OR a rotary cutter
    – A ruler or quilting square
    – An iron

    If you have wide satin ribbon:
    – Wide Satin Ribbon – preferably polyester rather than natural fabric
    – Scissors
    – A lighter AND/OR a tea candle (you’ll melt the ribbon instead of gluing or sewing

    If your fabric is made of a polyester material, you might be able to melt it as well (one of the videos linked below shows this). PLEASE be careful. This is not the time for injuries!

    The next set of items are good for either method, and you can improvise as you wish, depending on the supplies you have

    Buttons, gems, or beads to decorate the centers of the flowers
    Pin backs, barrettes, bobby pins, combs, or other findings to which you can affix the finished flowers
    Hot glue gun
    Pointy tweezers

    Resources:

    I learned to make the yellow flower above from a tutorial by Diane Gilleland, and she subsequently published a book called Kanzashi In Bloom with instructions on how to make them. I have the book and that’s mostly what I’ll be working from. It’s available as a Kindle eBook and in the Apple Books bookstore as well, currently $9.99.

    There are a LOT of YouTube videos on how to fold as well. Many of them focus on using ribbon, which I don’t have a lot of. So you’re on your own, gnome! But these videos looked useful:

    If you decide you like making these, once nice thing is it’s a hobby that doesn’t take up much room and is extremely portable… you know, for when we can go places. Heh. Anyway…

    If you precut squares of fabric or ribbon, you can tuck them and your other supplies in a little zipper pouch and go someplace else with them. Like the other room. Or the couch, or the bed. Or the back porch! Anywhere, as long as right now, you are staying home as much as you can!

    If we can’t go to the flowers, let’s make some!

    See you, space gnomes!

  • A zine for the season

    For spring! I have created a zine that you can print out and fold yourself then read to learn how to draw a simple labyrinth. It’s in PDF format, and is in color, but you can print in black and white if you prefer, and it is still legible.

    A small preview:

    To assemble, fold in half and crease, then unfold. Do this in both directions. Then, holding it horizontally, fold the ends to the middle and crease. Unfold.

    Using a blade, and a ruler if you prefer, slice the middle horizontally along the fold. Slice between the middle 4 “pages” – do not slice all the way – leave the ends uncut.

    Then fold lengthwise with the unprinted sides together. Push the middle pages outwards and crease. Fold with the covers (which are in the upper left in the image above) on the outside.

    If you need a little visual assistance, this video might help:

    And you might even want to make your own!

    But don’t forget to download the How to Draw a Labryrinth Zine!

    I hope that you enjoy it!